Setting up the Three.js ellipsoids
Introduction
In the previous articles in this series we talked about:
- Part 1: Reading VTK format particles with Javascript in a browser
- Part 2: Saving the read-in particle data in a Vuex store
- Part 3: Initialization of a store and the user interface.
- Part 4: Setting up the Three.js renderer
- Part 5: Setting up the Three.js scene and camera
We are now ready to discuss the three-ellipsoid-particles component that we introduced in
ThreeGraphicsPanel.vue. Recall that the template has the following form:
<template>
  <div id='three-graphics-container'>
    <div class="uk-card uk-card-default uk-card-large">
      <div class="uk-card-body">
        <three-renderer v-bind:size="{w:500, h:500}">
          <three-scene v-bind:size="size">
            <three-camera v-bind:size="size" v-bind:position="{x: 100,  z: 15 }">
            </three-camera>
            <three-ellipsoid-particles> </three-ellipsoid-particles>
          </three-scene>
        </three-renderer>
      </div>
    </div>
  </div>
</template>
The ellipsoid particles component
The file ThreeEllipsoidParticles.vue also does not contain any information inside the
<template> tags and contains the following:
<template> </template>
<script src="./ThreeEllipsoidParticles.ts"> </script>
However, the source code contains more - as you can see below.
import * as Vue from "vue";
import { Component, Lifecycle } from 'av-ts';
import THREE = require("three");
import Store from "./Store";
@Component({
  name: 'ThreeEllipsoidParticles'
})
export default class ThreeEllipsoidParticles extends Vue {
  @Lifecycle
  public created() {
    // Create a watch in the store to make sure the particle
    // file has been read before particles are created
    var self = this;
    Store.watch(
      function () {
        return Store.getters.particleReadComplete;
      },
      function () {
        if (Store.getters.particleReadComplete)
          self.createThreeParticles();
      });
  }
  // Actually create the particles
  private createThreeParticles() {
    ..... see below ....
  }
}
There are several aspects that need consideration in this code.
We use the watch “instance method” of Vuex to make sure that
the particles are added to the scene only after the particle file has been read.
In this example
we do not stop watching the variable particleReadComplete (see Part 2 for details) after the particle data has been converted and saved. However, that step is highly recommended.
Creating the ellipsoid particles
The particle axis data are in the form of angles between the ellipsoid axes and the world coordinate axes.
These are converted directly into the appropriate rotation matrix. Sphere objects are then created at
the origin, rotated, scaled, and translated to their actual positions. The sphere objects are then
transformed into SphereBufferGeometry objects to make their manipulation slightly more efficient.
Finally, a “material” shading model is added to make sure that the image displayed isn’t flat and
a triangulated mesh is generated for each object.
  private createThreeParticles() {
    // Get the particle data
    let particles = Store.getters.particleData;
    // Extract the radius and center
    let radii = particles["Radius"];
    let centers = particles["Position"];
    let axes_a = particles["Axis a"];
    let axes_b = particles["Axis b"];
    let axes_c = particles["Axis c"];
    // Loop through particles
    var self = this;
    radii.map(function (radius: any, index: number) {
      // Get the radius ratios
      let ratio = [1.0, radius[1]/radius[0], radius[2]/radius[0]];
      // Get the axes into vectors and compute rotation matrix
      let axis_a =
        new THREE.Vector3(Math.cos(axes_a[index][0]),
                          Math.cos(axes_a[index][1]),
                          Math.cos(axes_a[index][2]));
      let axis_b =
        new THREE.Vector3(Math.cos(axes_b[index][0]),
                          Math.cos(axes_b[index][1]),
                          Math.cos(axes_b[index][2]));
      let axis_c =
        new THREE.Vector3(Math.cos(axes_c[index][0]),
                          Math.cos(axes_c[index][1]),
                          Math.cos(axes_c[index][2]));
      let rotMatrix = new THREE.Matrix4();
      rotMatrix.set(
        axis_a.x, axis_b.x, axis_c.y, 0,
        axis_a.y, axis_b.y, axis_c.y, 0,
        axis_a.z, axis_b.z, axis_c.z, 0,
        0, 0, 0, 1
        );
      // Create the sphere geometry
      const sph_geometry = new THREE.SphereGeometry(radius[0], 32, 16);
      // Rotate sphere
      sph_geometry.applyMatrix(rotMatrix);
      // Convert into ellipsoid
      sph_geometry.applyMatrix(new THREE.Matrix4().makeScale(ratio[0], ratio[1], ratio[2]));
      // Translate the geometry
      let center = new THREE.Vector3(centers[index][0], centers[index][1], centers[index][2]);
      sph_geometry.translate(center.x, center.y, center.z);
      // Convert into buffer geometry
      const geometry = new THREE.BufferGeometry().fromGeometry(sph_geometry);
      // Create the material for display purposes
      const material = new THREE.MeshPhongMaterial({
        color: 0xffaa00,
        emissive: 0x072534,
        side: THREE.DoubleSide,
        shading: THREE.SmoothShading,
        wireframe: false
      });
      // Create the mesh
      const sphere = new THREE.Mesh(geometry, material);
      // Save the data
      Store.commit('ADD_THREE_OBJECT', sphere);
    });
    Store.commit('THREE_OBJECTS_CREATED', true);
  }
The rotation matrix performs a transformation of the form \(\hat{\mathbf{w}} = \boldsymbol{R} \cdot \mathbf{w}\,.\) We want to rotate the world coordinate vectors \(\mathbf{E}_1\), \(\mathbf{E}_2\), \(\mathbf{E}_3\), into vectors that are aligned with the ellipsoid axes, \(\mathbf{e}_1\), \(\mathbf{e}_2\), \(\mathbf{e}_3\). Therefore, we need to find a rotation matrix \(\boldsymbol{R}\) such that \(\mathbf{e}_\alpha = \boldsymbol{R}\cdot\mathbf{E}_\alpha\) where \(\alpha = 1,2,3\). Taking dot products of both sides with \(\mathbf{E}_\beta\), we get \(\mathbf{E}_\beta\cdot\mathbf{e}_\alpha = \mathbf{E}_\beta\cdot\boldsymbol{R}\cdot\mathbf{E}_\alpha = (\mathbf{E}_\beta\otimes\mathbf{E}_\alpha):\boldsymbol{R} \,.\) Now, \(\boldsymbol{R} = R_{mn} \mathbf{E}_m \otimes \mathbf{E}_n\). So we have \(\mathbf{E}_\beta\cdot\mathbf{e}_\alpha = R_{mn} (\mathbf{E}_\beta\otimes\mathbf{E}_\alpha): (\mathbf{E}_m \otimes \mathbf{E}_n) = R_{mn} (\mathbf{E}_\beta\cdot\mathbf{E}_m) (\mathbf{E}_\alpha \cdot \mathbf{E}_n) = R_{mn} \delta_{\beta m} \delta_{\alpha n}\). Therefore, \(\mathbf{E}_\beta\cdot\mathbf{e}_\alpha = R_{\beta\alpha}\).
Let us look at the ellipsoid axis vector \(\mathbf{e}_1 = \mathbf{e}_a\). This vector has components \((e_{11}, e_{12}, e_{13})\) where \(e_{11} = \mathbf{e}_1 \cdot \mathbf{E}_1 = R_{11}\), \(e_{12} = \mathbf{e}_1 \cdot \mathbf{E}_2 = R_{21}\), and \(e_{13} = \mathbf{e}_1 \cdot \mathbf{E}_3 = R_{31}\). That is why we can create the rotation matrix directly from the axis data in the code sample.
Remarks
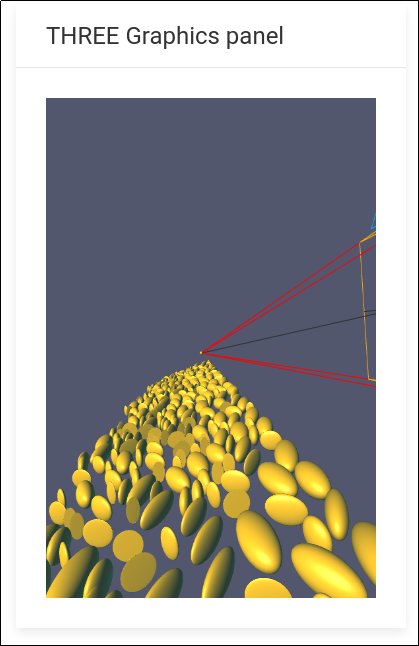
A plot of the ellipsoids produced by our code can be seen below.

In the next part of this series we will explore how vtk.js can be used to do the same plot.