Inspecting and manipulating meshes in Salome-Meca for Code-Aster
In this article, I will discuss how elements can be selected from deep inside a 3D mesh
in the Salome-Meca environment and manipulated with Python scripts.
Code-Aster provides a large number of verification tests, several of which can also serve
as tutorials on how to use the software. Some of these tests have associated meshed models
that are provided as part of the distribution with much detail on how these meshes were
generated.
One such case is the tutorial FORMA07 (Model B), which I have expanded upon in my
translation at Code-Aster Manuals.
The mechanics problem
The problem involves a circular crack in a box that is modeled as an X-FEM interface.
The Code-Aster model is built in two stages:
- a coarse mesh is created and then refined with the mesh refinement tool
HOMARDafter insertion of an X-FEM interface - the refined mesh is used for a static mechanics simulation after enrichment with the X-FEM crack
These features are both very convenient and useful for getting initial estimates of crack tip stress intensity factors and energy release rates.
The initial model
Let us create a model in the Geom module of Salome-Meca. For that we can create a box,
translate it, and then partition it with a plane.
import salome
import salome_notebook
import GEOM
from salome.geom import geomBuilder

# Initialize
salome.salome_init()
notebook = salome_notebook.NoteBook()
geompy = geomBuilder.New()

# Create box
box = geompy.MakeBoxDXDYDZ(10, 10, 20)
box = geompy.MakeTranslation(box, 0, 0, -10)

# Partition box with a plane
sk = geompy.Sketcher2D()
sk.addPoint(-10.000000, -10.000000)
sk.addSegmentAbsolute(-10.000000, 20.000000)
sk.addSegmentAbsolute(20.000000, 20.000000)
sk.addSegmentAbsolute(20.000000, -10.000000)
sk.close()
coord_sys_2D = geompy.MakeMarker(0, 0, 0, 1, 0, 0, 0, 1, 0)
Sketch_1 = sk.wire(coord_sys_2D)
Face_1 = geompy.MakeFaceWires([Sketch_1], 1)
box_partitioned = geompy.MakePartition([box], [Face_1], [], [], geompy.ShapeType["SOLID"], 0, [], 0)

# Add the partitioned box
geompy.addToStudy( box_partitioned, 'Box_Partitioned' )

# Update objects
if salome.sg.hasDesktop():
  salome.sg.updateObjBrowser()
Next we will mesh the geometry with a coarse mesh (8 elements per cube) using the Mesh
module of Salome-Meca.
The Python script for that step is also straightforward and the mesh is output in MED format
to a file called box_mesh.med:
import  SMESH, SALOMEDS
from salome.smesh import smeshBuilder

smesh = smeshBuilder.New()

# Set up the meshing algorithm
box_mesh = smesh.Mesh(box_partitioned)
Regular_1D = box_mesh.Segment()
Number_of_Segments_1 = Regular_1D.NumberOfSegments(2)
Quadrangle_2D = box_mesh.Quadrangle(algo=smeshBuilder.QUADRANGLE)
Quadrangle_Parameters_1 = Quadrangle_2D.QuadrangleParameters(smeshBuilder.QUAD_STANDARD,-1,[],[])
Hexa_3D = box_mesh.Hexahedron(algo=smeshBuilder.Hexa)

# Compute the mesh
isDone = box_mesh.Compute()

# Set names of Mesh objects
smesh.SetName(Regular_1D.GetAlgorithm(), 'Regular_1D')
smesh.SetName(Hexa_3D.GetAlgorithm(), 'Hexa_3D')
smesh.SetName(Quadrangle_2D.GetAlgorithm(), 'Quadrangle_2D')
smesh.SetName(Number_of_Segments_1, 'Number of Segments_1')
smesh.SetName(Quadrangle_Parameters_1, 'Quadrangle Parameters_1')
smesh.SetName(box_mesh.GetMesh(), 'box_mesh')

# Write the mesh to a file in MED format
box_mesh.ExportMED(r'/home/Salome/forma07b/box_mesh.med')

# Update objects
if salome.sg.hasDesktop():
  salome.sg.updateObjBrowser()
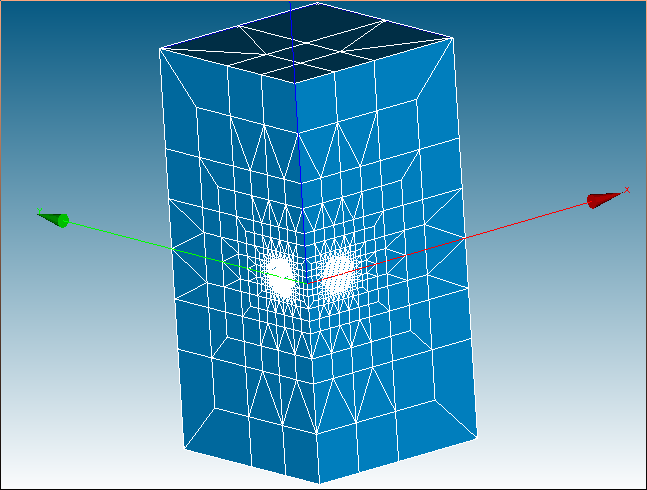
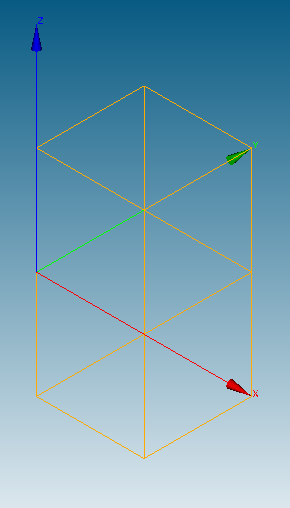
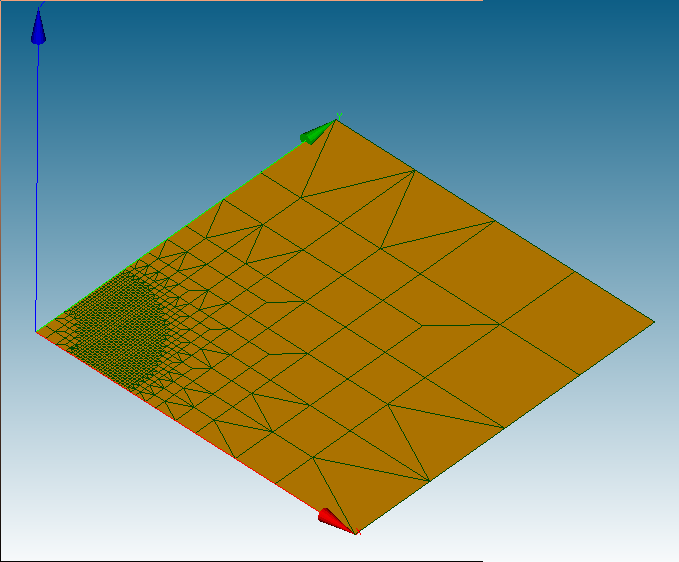
These scripts produce the geometry and the mesh shown in the figure below.

The refined model
If we use the command file in for Model B of V3.04.156, and run the
commands via astk, we get the warning
!-------------------------------------------------------------------------------------------------!
! <A> <XFEM_63>                                                                                   !
!                                                                                                 !
!       -> ---Éléments XFEM quadratiques ---                                                      !
!     On a effectué un ajustement géométrique de la fissure, car les arêtes du maillage sain sont !
!     coupées plusieurs fois par l'isovaleur zéro de la level-set.                                !
!     Le nombre d'ajustements effectués est : 4804.                                               !
!     Cette correction impacte légèrement la localisation de la fissure.                          !
!   -> Conseil :                                                                                  !
!     Veuillez vérifier en post-traitement grâce à la commande POST_MAIL_XFEM que la nouvelle     !
!     géométrie de la fissure respecte la géométrie imposée dans la commande DEFI_FISS_XFEM.      !
!                                                                                                 !
!                                                                                                 !
! This is a warning. If you do not understand the meaning of this                                 !
!  warning, you can obtain unexpected results!                                                    !
!-------------------------------------------------------------------------------------------------!
A rough translation is
XFEM_63

We carried out a geometrical adjustment of crack, because the edges of the
valid mesh are cut several times by the zero isovalue of the level-set.
The number of adjustments made is: 4804
This correction slightly impacts the location of the crack.

Advice:
Please check in postprocessing using the command POST_MAIL_XFEM that the new geometry of the
crack respects the geometry imposed in the command DEFI_FISS_XFEM.
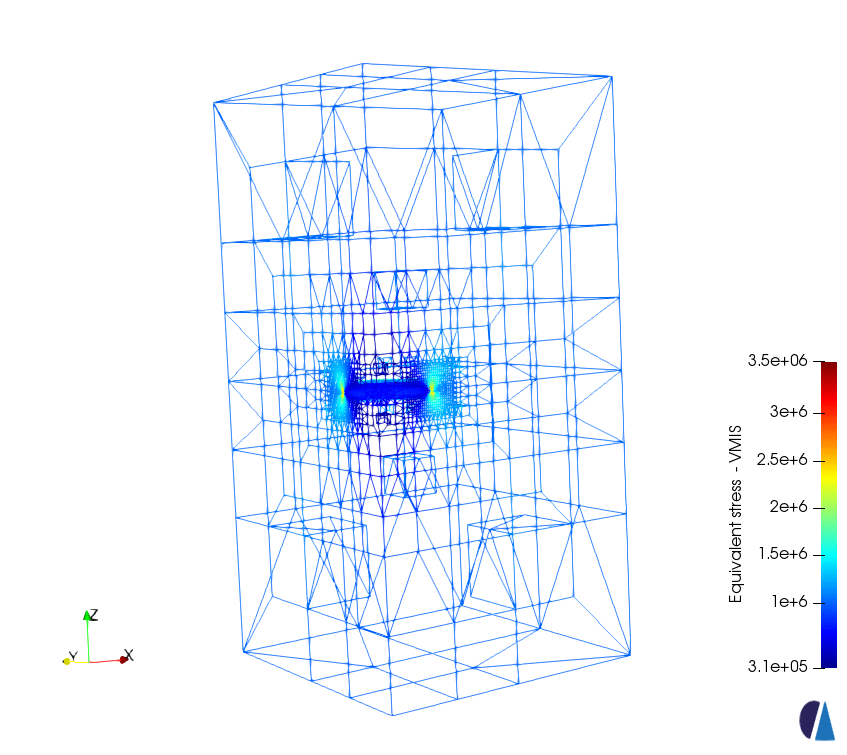
We just check the MED file that’s produced and see it it looks OK at the coarse scale:
Geometry groups
Note that we need to add various geometry groups to the mesh. We should create the groups when we model the geometry, as that is more convenient.
# Create the geometry groups
top_face = geompy.CreateGroup(box_partitioned, geompy.ShapeType["FACE"])
geompy.UnionIDs(top_face, [50])
bot_face = geompy.CreateGroup(box_partitioned, geompy.ShapeType["FACE"])
geompy.UnionIDs(bot_face, [31])
symm_face_xz = geompy.CreateGroup(box_partitioned, geompy.ShapeType["FACE"])
geompy.UnionIDs(symm_face_xz, [45, 14])
symm_face_yz = geompy.CreateGroup(box_partitioned, geompy.ShapeType["FACE"])
geompy.UnionIDs(symm_face_yz, [38, 4])
right_face = geompy.CreateGroup(box_partitioned, geompy.ShapeType["FACE"])
geompy.UnionIDs(right_face, [58, 34])
back_face = geompy.CreateGroup(box_partitioned, geompy.ShapeType["FACE"])
geompy.UnionIDs(back_face, [55, 26])
fixed_vert = geompy.CreateGroup(box_partitioned, geompy.ShapeType["VERTEX"])
geompy.UnionIDs(fixed_vert, [24])

# Add the groups to the parent
geompy.addToStudyInFather( box_partitioned, top_face, 'top_face' )
geompy.addToStudyInFather( box_partitioned, bot_face, 'bot_face' )
geompy.addToStudyInFather( box_partitioned, symm_face_xz, 'symm_face_xz' )
geompy.addToStudyInFather( box_partitioned, symm_face_yz, 'symm_face_yz' )
geompy.addToStudyInFather( box_partitioned, right_face, 'right_face' )
geompy.addToStudyInFather( box_partitioned, back_face, 'back_face' )
geompy.addToStudyInFather( box_partitioned, fixed_vert, 'fixed_vert' )
To transfer these groups to the mesh, use
# Transfer the geometry groups to the mesh
top_face_1 = box_mesh.GroupOnGeom(top_face, 'top_face', SMESH.FACE)
bot_face_1 = box_mesh.GroupOnGeom(bot_face, 'bot_face', SMESH.FACE)
symm_face_xz_1 = box_mesh.GroupOnGeom(symm_face_xz, 'symm_face_xz', SMESH.FACE)
symm_face_yz_1 = box_mesh.GroupOnGeom(symm_face_yz, 'symm_face_yz', SMESH.FACE)
right_face_1 = box_mesh.GroupOnGeom(right_face, 'right_face', SMESH.FACE)
back_face_1 = box_mesh.GroupOnGeom(back_face, 'back_face', SMESH.FACE)
fixed_vert_1 = box_mesh.GroupOnGeom(fixed_vert, 'fixed_vert', SMESH.NODE)

# Update the groups names on the mesh (if needed)
smesh.SetName(top_face_1, 'top_face')
smesh.SetName(bot_face_1, 'bot_face')
smesh.SetName(symm_face_xz_1, 'symm_face_xz')
smesh.SetName(symm_face_yz_1, 'symm_face_yz')
smesh.SetName(right_face_1, 'right_face')
smesh.SetName(back_face_1, 'back_face')
smesh.SetName(fixed_vert_1, 'fixed_vert')
Running the simulation (first attempt)
Let us now try to run the simulation in AsterStudy with the input file provided in
Model B of V3.04.156.
The simulation aborts with the error (roughly translated)
!-----------------------------------------------------------------------------------------------!
! <EXCEPTION> <XFEM_13>                                                                         !
!                                                                                               !
!  In the model, elements SEG2 or SEG3 have new nodes enriched by X-FEM.                        !
!  This is not yet possible in 3D.                                                              !
!  Advice: if these elements are important for computation (linear load), they should           !
!  be put far from crack.                                                                       !
!  If these elements are not used for computation, it is better not to assign them in the model,!
!  or to remove the elements.                                                                   !
!-----------------------------------------------------------------------------------------------!
Removing SEG2/SEG3 elements
At this point we can use two resources:
- the
Helpmenu inSalome-Meca - the example Python scripts in the
Code-Asterinstallation undershare/doc/salome/gui/SMESH/_downloads.
The example scripts will point you to the commands you should search for in the GUI Help window search box.
To remove the SEG3 elements in the mesh, we go to the Python Console and select the mesh using
mesh = salome.IDToObject("0:1:1:3")
mesh_6 = smesh.Mesh(mesh)
The IDToObject method takes an ID that can be identified by hovering the mouse over the mesh in the
object tree.
You can print the number of edges in the mesh and the associated geometry type with
print("Edges : ", mesh_6.NbEdges())
SMESH.GeometryType._items
Now, let us create a group that contains all the edge elements (SEG3):
seg3_filter = smesh.GetFilter(SMESH.EDGE, SMESH.FT_ElemGeomType, SMESH.Geom_EDGE)
seg3_ids = mesh_6.GetIdsFromFilter(seg3_filter)
g_seg3_elems = mesh_6.CreateEmptyGroup(SMESH.EDGE, "seg3_elems")
elems = g_seg3_elems.Add(seg3_ids)
salome.sg.updateObjBrowser()
If you select the group seg3_elems, and hide the rest of the mesh you will see the
selected edges.
Remove these edges from the mesh:
mesh_6.RemoveGroupWithContents(g_seg3_elems)
mesh_6.RenumberElements()
salome.sg.updateObjBrowser()
Now you can save the mesh to a MED file. Let us call it box_mesh_refined_no_seg3.med.
Running the simulation (second attempt)
If you run the simulation with the new mesh (with SEG3 elements removed), you will
get a fatal error and the simulation will fail with the message:
!!!!!!!!!!!!!!!!!!!!!!!!!!!!!!!!!!!!!!!!!!!!!!!!!!!!!!!!!!!!!!!!!!!!!!!!!!!!!!!!!!!
! <S> Exception user raised but not interceptee.                                  !
! The bases are fermees.                                                          !
! Type of the exception: error                                                    !
!                                                                                 !
!  La maille de peau : M445 ne peut pas être réorientée.                          !
!  Car elle est insérée entre 2 mailles "support" placées de part et d'autre :    !
! M4727 et M6279.                                                                 !
!                                                                                 !
! Conseils :                                                                      !
!  Vous pouvez utiliser les mots-clés GROUP_MA_VOL en 3D et GROUP_MA_SURF en 2D   !
! pour choisir une des                                                            !
!  deux mailles supports et ainsi choisir la normale permettant la réorientation. !
!!!!!!!!!!!!!!!!!!!!!!!!!!!!!!!!!!!!!!!!!!!!!!!!!!!!!!!!!!!!!!!!!!!!!!!!!!!!!!!!!!!
This message translates to
The face mesh: M445 cannot be reoriented
Because it is inserted between 2 "support" elements placed on either side
M4727 and M6279.

Tips:
You can use the keywords GROUP_MA_VOL in 3D and GROUP_MA_SURF in 2D
to choose one of two mesh supports and thus choose the normal, allowing
reorientation.
Locating elements by number
Let use load the mesh in a new study in Salome-Meca and go to the Python Console.
As before, select the mesh:
mesh = salome.IDToObject("0:1:1:3")
mesh_6 = smesh.Mesh(mesh)
This time create the three element groups for the elements 445, 4727, and 6279.
elem_445 = mesh_6.CreateEmptyGroup( SMESH.FACE, 'elem_445' )
elems = elem_445.Add([445])
elem_4727 = mesh_6.CreateEmptyGroup( SMESH.VOLUME, 'elem_4727' )
elems = elem_4727.Add([4727])
elem_6279 = mesh_6.CreateEmptyGroup( SMESH.VOLUME, 'elem_6279' )
elems = elem_6279.Add([6279])
salome.sg.updateObjBrowser()
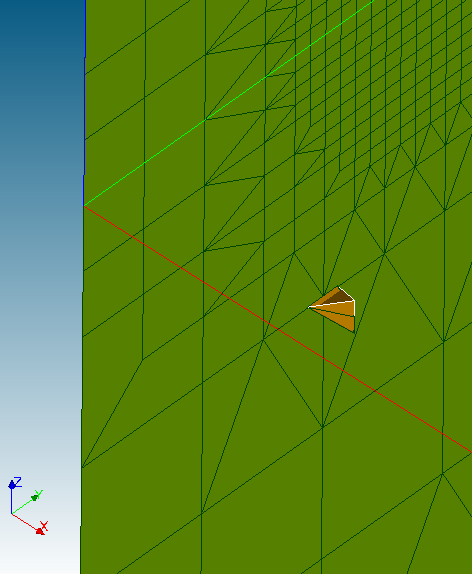
Now we can select these groups, and turn off the other groups (except a reference group that will help you locate the elements in space). The images below immediately identify the problem: the face elements have been placed internally in the mesh and are shared with two elements that share a face. These face elements will have to be removed.
We could use the method used for removing the SEG3 elements, but run the risk of removing
elements that may be needed. So let us try a more controlled approach.
First, let use select the boundary face groups and create a filter criterion. Before we do that, let us make sure that the group names do not have any spaces:
g_names = mesh_6.GetGroupNames()
for name in g_names:
   gr = mesh_6.GetGroupByName(name)
   gr[0].SetName(name.strip())
Next, we select the boundary face groups:
symm_face_xz = mesh_6.GetGroupByName("symm_face_xz")
symm_face_yz = mesh_6.GetGroupByName("symm_face_yz")
top_face = mesh_6.GetGroupByName("top_face")
bot_face = mesh_6.GetGroupByName("bot_face")
right_face = mesh_6.GetGroupByName("right_face")
back_face = mesh_6.GetGroupByName("back_face")
Then we select the faces that do not belong to any of the boundary faces that we need. To do that, we set up filter criteria:
g_criteria = []
crit = smesh.GetCriterion(SMESH.FACE, SMESH.FT_BelongToMeshGroup, '=',
                          bot_face[0], SMESH.FT_LogicalNOT)
g_criteria.append(crit)
crit = smesh.GetCriterion(SMESH.FACE, SMESH.FT_BelongToMeshGroup, '=',
                          top_face[0], SMESH.FT_LogicalNOT)
g_criteria.append(crit)
crit = smesh.GetCriterion(SMESH.FACE, SMESH.FT_BelongToMeshGroup, '=',
                          right_face[0], SMESH.FT_LogicalNOT)
g_criteria.append(crit)
crit = smesh.GetCriterion(SMESH.FACE, SMESH.FT_BelongToMeshGroup, '=',
                          back_face[0], SMESH.FT_LogicalNOT)
g_criteria.append(crit)
crit = smesh.GetCriterion(SMESH.FACE, SMESH.FT_BelongToMeshGroup, '=',
                          symm_face_xz[0], SMESH.FT_LogicalNOT)
g_criteria.append(crit)
crit = smesh.GetCriterion(SMESH.FACE, SMESH.FT_BelongToMeshGroup, '=',
                          symm_face_yz[0], SMESH.FT_LogicalNOT)
g_criteria.append(crit)
Next create a filter from the criteria:
g_filter = smesh.GetFilterFromCriteria(g_criteria)
The remaining faces are unwanted. Let us create a group using the filter criteria.
unwanted_faces = mesh_6.GroupOnFilter( SMESH.FACE, "unwanted_faces", g_filter)
salome.sg.updateObjBrowser()
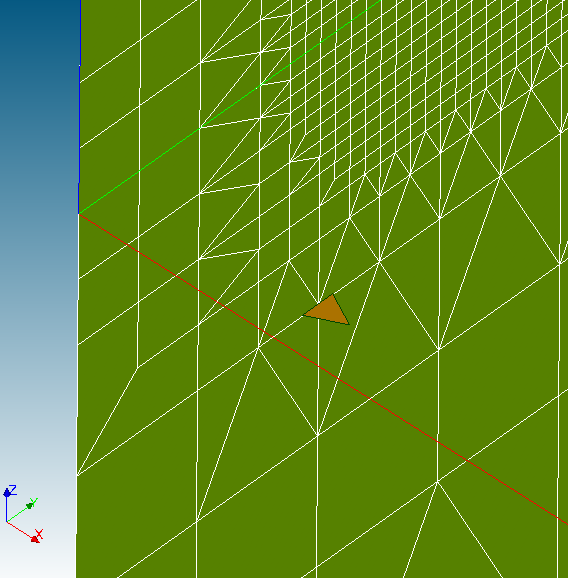
The faces in this group are shown below:
Now you can remove these faces from the mesh, and the element groups for the three individual elements that you had created to check things:
mesh_6.RemoveGroup(elem_445)
mesh_6.RemoveGroup(elem_4727)
mesh_6.RemoveGroup(elem_6279)
mesh_6.RemoveGroupWithContents(unwanted_faces)
mesh_6.RenumberElements()
salome.sg.updateObjBrowser()
Let us save this new mesh to box_mesh_refined_final.med.
Running the simulation (third attempt)
If you run the simulation case with the new file, you will get a solution.